News
A Flea Market in the Dark - Downtown Phoenix August 7, 2016 15:47 12 Comments
It's tough going to Flea Markets in Phoenix during the summer. The 110+ degree weather tends to deter even me, a complete junk lover, from venturing out! So when I heard that there was going to be a Flea Market at NIGHT and INDOORS for that matter, I thought, "Wow, now that's one Flea Market I would seriously consider going to (even in the middle of a Phoenix Summer)!"
The market is called the "Phoenix Flea" and is self described as a "modern market for curated vintage clothing & accessories, fine art, handcrafted, fashion & more!" So this isn't just your run of the mill Flea Market. No, its much more Hip, more like walking into a live version of Etsy!
Repost @cheers.scottsdale
I couldn't help but to love every one of their Instagram posts and I was sold when I heard that it would be: at night, indoors, adults only, with a DJ and FOOD TRUCKS! What a great combination. So I asked my best friend if he would join me and because he is so amazing and loves going to these things just as much as I do (actually I sold him on the food part), he said Yes! I went on their website and bought our tickets and by 7:30 pm we were there!
 It was hosted at the Vintage 45 in Downtown Phoenix. A cool old building just off of Central. You know the kind with exposed duct work, old brick and unfinished plastered walls with concrete floors. The kind of building that screams age, charm, character and would be the perfect backdrop for just about any photo shoot.
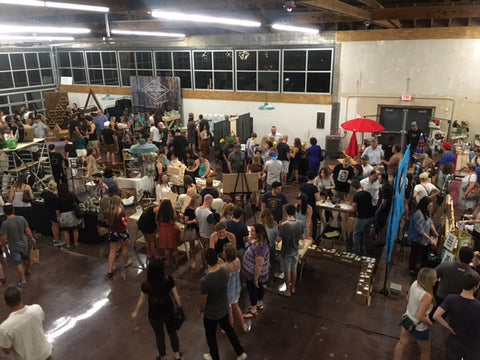
It was apparent their Instagram marketing was very effective. There were a total of 3 rooms and each room was just as packed as the other with both vendors and shoppers.
The creativity in this place was amazing! The market definitely lived up to its description. There were well curated pieces everywhere; jewelry, candles, mid-century, vintage, furniture, leather goods, so much to name! It was awesome to see local artists showcasing their goods with so much support from the valley community.
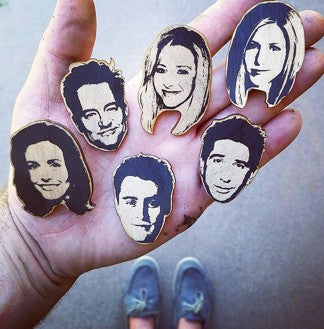
I found the magnets by Lettercraft to be some of the most amusing pieces. They had a great selection of actors and singers available for purchase.
Repost @lettercraft

Lifetime Leather Co. had some of the best handmade leather goods that I have seen. Beautiful messenger bags, wallets and more. Great craftsmanship for sure!
There were so many vendors and items I wanted to picture, but unfortunately the crowds were thick and it was somewhat difficult to take pics. For more pics of the great items and for a list of vendors, check out their Facebook page (Phoenix Flea) or Instagram #phxflea.
The second floor of the venue housed the DJ and a great area to relax and overlook the crowd.

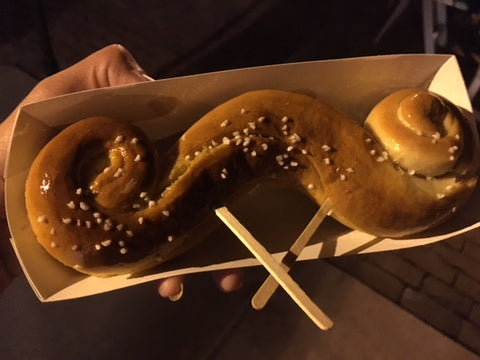
I kept my promise to my BFF and as we walked out we went through the Food Truck lineup. That's where I picked up this cute mustache pretzel:
Overall, I give a thumbs up to Phoenix Flea. It definitely lived up to its hype and brand. It was a great evening out (or in, I should say). It will be something I look forward to going to again! So proud of our local Arizona artists and wish them all the success in their business endeavors!
Until our next adventure,
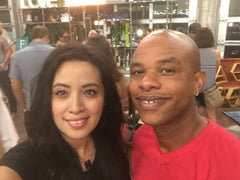
Christina & Mike
Purpose Thrift Boutique
Freshen up Antique Furniture in 3 Easy Steps - No Re-staining Required! July 30, 2016 17:43 2 Comments
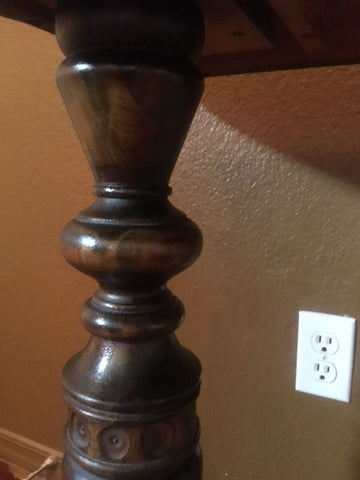
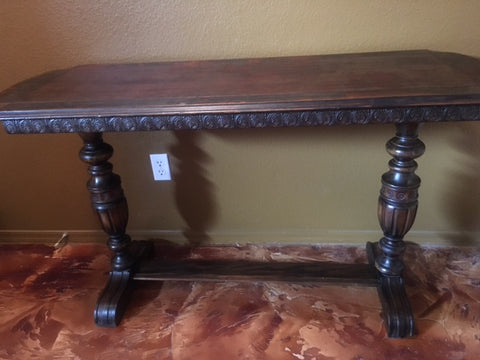
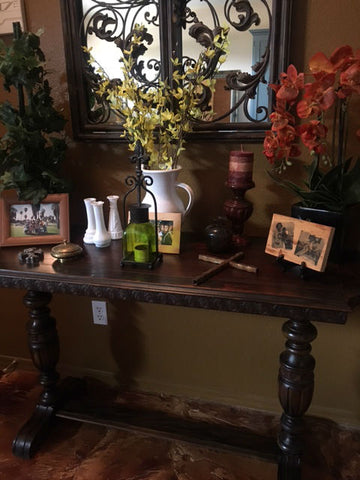
The antique entry table in my living room has great character and detail. I appreciate all of the craftsmanship that went into creating this beauty many, many years ago. Overall, this piece is still in incredibly great shape and I chose not to repaint it. I really love the deep color of the original wood and thought it was a great contrast to some of the lighter decor in the room. Lately though, no matter how much I dust it (& since I live in Arizona, I have to dust quite often), it has begun to look quite dull.
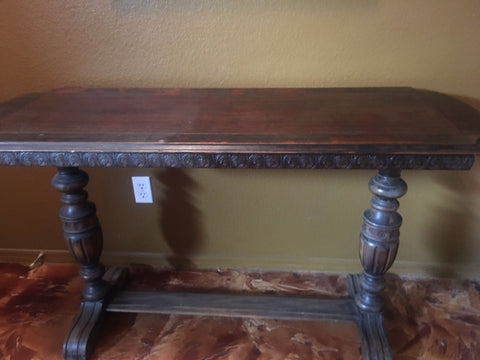
I really did not want to spend the time and effort to sand and re-stain it. But my entry table was looking like an entirely different shade of brown and I knew it needed some help. While I was dusting and contemplating on what I should do, I could hear my mother's voice in my head saying, "Old English Mija" (Mija is Spanish slang for "daughter").
My mom is a big advocate of Old English and I must say she can back up her recommendation with experience. She has had her own professional cleaning business for over 30 years and primarily deals with homes sprawling with vintage and antique furniture. She swears by Old English to spruce up not just antique but most wood furniture. So I decided in that moment, I would take my mother's advice and give it a try. I found two bottles under my sink and decided to use the one labeled "for dark woods."
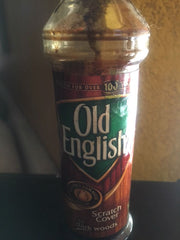
Side Note: For those of you that are not familiar with Old English; it comes in both an aerosol and oil. I used the oil. The label states that it is a scratch cover and helps to restore damaged wood. (Also, we are not affiliated with or being compensated in anyway by Old English)
Step #1: I gave the table a quick overall dusting.
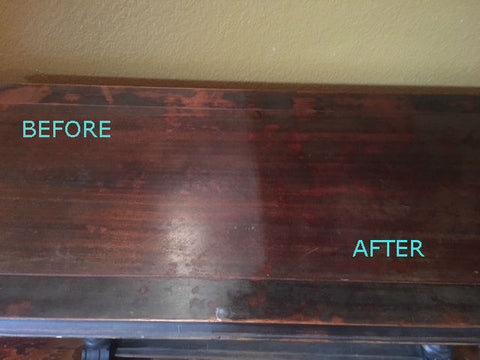
Step #2: Using a microfiber rag, I poured about 5 drops of Old English oil on the rag (a little goes a long way) and began to wipe the table going in the same direction of the wood grain. I would recommend wearing plastic gloves because, as is with any oil, it can easily get on your hands (although if it does, it is an easy cleanup). Immediately upon applying the oil to the table, I began to see a major difference:
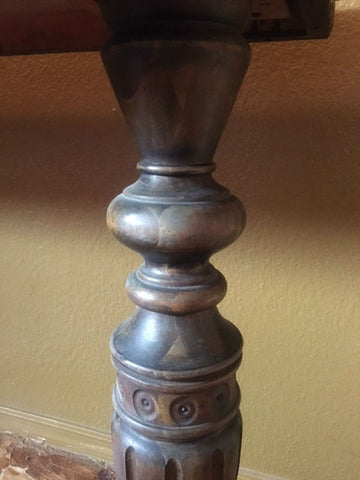
Since this is a darker oil, it stained my yellow microfiber rag but it was a small price to pay for the great results. I continued putting oil on my rag as needed and wiped it on the entire table; legs, base, etc.
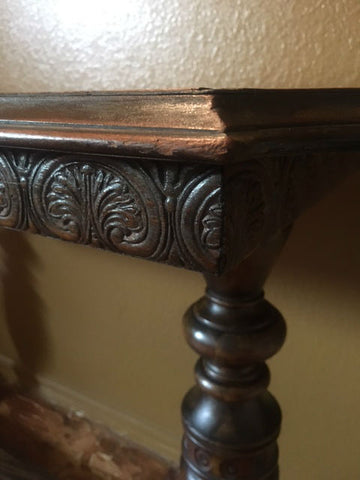
Here's a picture of the table leg before the oil was applied:
Here's a picture of the table leg after the oil was applied:
Within about 20 minutes of application, my table looked like it had new life and was back to its beautiful dark wood color!
Step #3: Once I applied the oil to the entire table, I took a dry microfiber towel and wiped it down again, this time without any oil. This step is just to ensure the oil is spread evenly and no residue is left.
In less than half an hour, my table was done and there was no labor intensive sanding or re-staining required!
"Mother knows best" - definitely true in the case of Old English, and with many, many other things, my mom knows exactly what she's talking about. For a quick wooden antique furniture refresher, I would highly suggest applying Old English oil (now I sound like my mom!). It has definitely helped to bring back the shine and color to this thrifted, antique goody.
Next time you come across a thrift store wooden piece of furniture that looks dull and needs attention, you might want to think twice about passing it up! It may just need half an hour of your time, some Old English oil and 3 quick, easy steps to get it back to its original luster!
- Christina, Purpose Thrift Boutique
Follow us on Facebook or Instagram to view latest inventory!
2 Old Barstools Get a Makeover! October 15, 2015 13:13 4 Comments
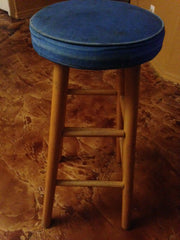
We've had the same two barstools for over 12 years! I've recovered the tops of them 3 times. But after raising kids and having countless dinner parties, these poor barstools looked like they had reached the end of the road! Each time my husband catches a glance of them, he threatens to throw them away. But I just felt like they still had some life in them and I convinced him to give me one last attempt at giving them a makeover.
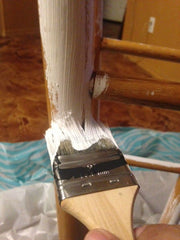
So after watching several HGTV design episodes last night, I was inspired to tackle this project. I began by removing the old fabric on top; 3 layers of fabric to be exact! I finally got down to the original blue cushion on top. I then cleaned the legs and took the hammer and hammered in a few ends that were getting loose.
I decided to use a white chalkpaint for the base. I just love chalkpaint; saves the time of having to sand the item and is easy to apply and dries fast! Because I was attempting all this in the middle of the night, I decided I would paint inside. I didn't really have any newspaper to cover the floor, but I remembered I did have some plastic table cloths from the dollar store. These come in handy and are an inexpensive, large piece of plastic to paint on top of.

Painting was a little more time consuming then I had envisioned, only because the base has several spindles and the wood must be painted on all sides. I put a total of two coats on each base and a coat of wax.
What a difference paint makes!

After my second coat of paint dried, I grabbed my staple gun and my glue gun and started working on recovering the cushion. On a side note - We are beginning a redesign at our home and switching out the brown color palette with a lighter and brighter design. I happened to have some amazing fabric in my craft room - I tend to buy extra fabric that catches my eye when I go to the store and save it for a midnight project, such as this :) The fabric is a beautiful pattern in white, with very light brown colors adorned with a turquoise bird. I knew I was saving this fabric for something special!
So I cut the fabric to size and began wrapping it over the cushion. I used my staple gun to staple it in place and used my glue gun to glue areas that were too narrow for my staple gun. Recovering the cushions were the fastest part of the project and took less than 45 minutes total.
Below are the results:

I'm pleased with the results. They are definitely, lighter and brighter and they look like new barstools. Most importantly, my husband said "wow" when he saw them and is looking forward to keeping these barstools for several more years!!
BEFORE AFTER


Transforming Furniture into "WOW" Pieces October 9, 2015 15:47 3 Comments
It amazes me to see the creativity on Pinterest and Social Media these days. The creative possibilities with furniture, just seem to be endless! I can't seem to look at Pinterest without saying "wow" at least 5 times during my search. It has really changed the way I look at a piece of furniture. I no longer find myself looking at furniture just for what it is, but rather what it could be.
Have you seen what they are doing with those old entertainment centers? Turning them into children's play kitchens or wardrobes. How about side tables? Flipping them upside down and making dog canopy beds? And with the introduction of chalk paint, the idea of painting furniture got a whole lot easier and quicker. I might have overlooked or dismissed furniture pieces in the past because they didn't quite fit my style, but now I view each piece as having its own potential to becoming a "wow" piece.
One of our very own customer friends, Becky Gifford, has the creative WOW factor! She views furniture as projects and transforms them into beautiful new pieces. For example, she purchased this dresser at Purpose Thrift.

It was a nice dresser to begin with and one might think a coat of paint in a solid color would suffice. But Becky saw a bigger picture. Becky looked at this dresser and saw a "Camera." A camera? Yes, a camera; an old Brownie camera as a matter of fact.
With paint and imagination, Becky began the work of transforming this dresser into what would resemble an old Brownie camera.


Using chalkpaint she purchased from Az Vintage Vault at Brass Armadillo, Becky began by painting the dresser a solid color. She used the General Finishes brand in Antique White and Driftwood Gray. She also used the Heirloom Traditions brand in Black Bean. She used the colors individually and also mixed some together to get the shades of gray she wanted.

"I painted the base color Driftwood and started layering the other colors with painters tape and free hand. I enlarged the actual Brownie type face and used carbon paper to outline the words onto the dresser. Surprisingly the camera company used letters of different size, so the dresser reflects that." Becky said.
With imagination and creativity, Becky transformed a regular dresser into a beautiful, creative, unique "WOW" piece of furniture!

BEFORE

AFTER
