News
2 Old Barstools Get a Makeover! October 15, 2015 13:13 4 Comments
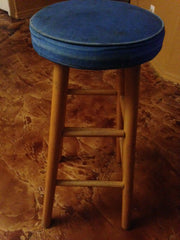
We've had the same two barstools for over 12 years! I've recovered the tops of them 3 times. But after raising kids and having countless dinner parties, these poor barstools looked like they had reached the end of the road! Each time my husband catches a glance of them, he threatens to throw them away. But I just felt like they still had some life in them and I convinced him to give me one last attempt at giving them a makeover.

So after watching several HGTV design episodes last night, I was inspired to tackle this project. I began by removing the old fabric on top; 3 layers of fabric to be exact! I finally got down to the original blue cushion on top. I then cleaned the legs and took the hammer and hammered in a few ends that were getting loose.
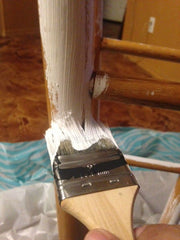
I decided to use a white chalkpaint for the base. I just love chalkpaint; saves the time of having to sand the item and is easy to apply and dries fast! Because I was attempting all this in the middle of the night, I decided I would paint inside. I didn't really have any newspaper to cover the floor, but I remembered I did have some plastic table cloths from the dollar store. These come in handy and are an inexpensive, large piece of plastic to paint on top of.
Painting was a little more time consuming then I had envisioned, only because the base has several spindles and the wood must be painted on all sides. I put a total of two coats on each base and a coat of wax.
What a difference paint makes!
After my second coat of paint dried, I grabbed my staple gun and my glue gun and started working on recovering the cushion. On a side note - We are beginning a redesign at our home and switching out the brown color palette with a lighter and brighter design. I happened to have some amazing fabric in my craft room - I tend to buy extra fabric that catches my eye when I go to the store and save it for a midnight project, such as this :) The fabric is a beautiful pattern in white, with very light brown colors adorned with a turquoise bird. I knew I was saving this fabric for something special!
So I cut the fabric to size and began wrapping it over the cushion. I used my staple gun to staple it in place and used my glue gun to glue areas that were too narrow for my staple gun. Recovering the cushions were the fastest part of the project and took less than 45 minutes total.
Below are the results:
I'm pleased with the results. They are definitely, lighter and brighter and they look like new barstools. Most importantly, my husband said "wow" when he saw them and is looking forward to keeping these barstools for several more years!!
BEFORE AFTER

Transforming Furniture into "WOW" Pieces October 9, 2015 15:47 3 Comments
It amazes me to see the creativity on Pinterest and Social Media these days. The creative possibilities with furniture, just seem to be endless! I can't seem to look at Pinterest without saying "wow" at least 5 times during my search. It has really changed the way I look at a piece of furniture. I no longer find myself looking at furniture just for what it is, but rather what it could be.
Have you seen what they are doing with those old entertainment centers? Turning them into children's play kitchens or wardrobes. How about side tables? Flipping them upside down and making dog canopy beds? And with the introduction of chalk paint, the idea of painting furniture got a whole lot easier and quicker. I might have overlooked or dismissed furniture pieces in the past because they didn't quite fit my style, but now I view each piece as having its own potential to becoming a "wow" piece.
One of our very own customer friends, Becky Gifford, has the creative WOW factor! She views furniture as projects and transforms them into beautiful new pieces. For example, she purchased this dresser at Purpose Thrift.

It was a nice dresser to begin with and one might think a coat of paint in a solid color would suffice. But Becky saw a bigger picture. Becky looked at this dresser and saw a "Camera." A camera? Yes, a camera; an old Brownie camera as a matter of fact.
With paint and imagination, Becky began the work of transforming this dresser into what would resemble an old Brownie camera.


Using chalkpaint she purchased from Az Vintage Vault at Brass Armadillo, Becky began by painting the dresser a solid color. She used the General Finishes brand in Antique White and Driftwood Gray. She also used the Heirloom Traditions brand in Black Bean. She used the colors individually and also mixed some together to get the shades of gray she wanted.

"I painted the base color Driftwood and started layering the other colors with painters tape and free hand. I enlarged the actual Brownie type face and used carbon paper to outline the words onto the dresser. Surprisingly the camera company used letters of different size, so the dresser reflects that." Becky said.
With imagination and creativity, Becky transformed a regular dresser into a beautiful, creative, unique "WOW" piece of furniture!

BEFORE

AFTER


